Knitting Basics | How to make a slip knot
The beginnings of any knitting project always start with the
slip knot. It’s the first stitch that goes onto your knitting needle and helps
you cast on more stitches. Without it, there’s no knitting project. If you
already know how to make a slip knot – that’s great, buddy. You can skip this
walk-through and move onto the next one. Everyone else, read on!
Everyone has their own way of making a slip knot, but I’ll
show you a super simple method that literally takes seconds to do. Let’s start!
Step 1
Unravel your selected yarn and create a long C-like shape. Leave about 10cm-15cm of the end of the yarn to create a tail. Ensure the yarn tail (shorter yarn length) is at the bottom and the working yarn (yarn coming from the skein/ ball) is on top.
Step 2
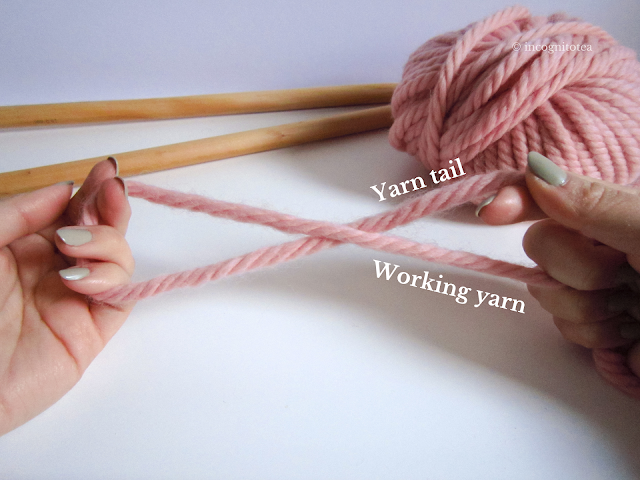
Hold the yarn ends with your right hand and loop with your left hand.
With your right hand, twist the loop downward to cross the two yarns together. The
crossed yarns should look like the photo below – yarn tail crossed under the
working yarn, and working yarn crossed over the yarn tail.
Step 3
Step 4
Congrats! You made a slip knot. Now, thread the knitting needle through the loop and
tighten it until it is snug against the needle (but not too tight). The loop is now your first stitch of any knitting project. From here you can cast on any number of stitches as required of a particular
project.
Tip! Don’t leave a long yarn tail behind as it’ll get very
annoying once you start knitting, from getting tangled with your working yarn
to just being a downright nuance. I recommend leaving a 10cm-15cm yarn tail so
there’s enough yarn for you to thread into the item once you’ve finished a
knitting a project.
Hope this simple and quick walk-through helped you learn your
first knitting basic. Feel free to ask any questions you may have about making
slip knots. Until next time, stay golden ya nerds.
- Del


Comments
Post a Comment